![]()
Stop Guessing. Start Harvesting.
![]()
Stop Guessing. Start Harvesting.
Do you want to harvest fresh, organic vegetables right outside your apartment door but worry that you lack the space, time, or experience to manage a traditional backyard plot?
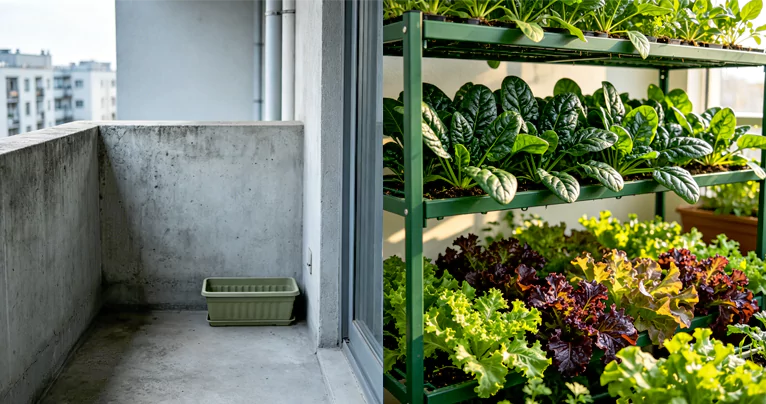
Growing food in containers on an elevated balcony actually gives you a massive natural advantage: it completely insulates your crops from destructive ground-level yard pests like moles, rabbits, gophers, and root-eating nematodes. By pairing compact, high-yield plant varieties with a smart vertical layout, anyone can transform a small concrete patio into a thriving edible sanctuary.
This step-by-step guide covers the fundamental rules of balcony gardening for beginners, helping you skip the trial-and-error phase entirely.
The easiest way to start balcony gardening for beginners is to use lightweight fabric grow bags or self-watering planters filled with a loose, soil-less potting mix (peat or coco coir blended with perlite). For your first crops, choose highly resilient, compact varieties like loose-leaf lettuce, bush green beans, and dwarf cherry tomatoes, which produce heavy yields in tight spaces.
Before running to the local nursery to buy plants, you must evaluate the unique structural and climatic conditions of your apartment patio. Successful beginner setups focus on three specific areas:
Different vegetables require different amounts of light energy to grow. Fruiting plants like tomatoes, peppers, and cucumbers are sun-worshippers that need 6 to 8+ hours of direct sunlight to set blossoms. If your balcony faces North or East and sits in partial shade, pivot your layout toward leafy greens (lettuce, spinach, kale) and herbs, which thrive beautifully on just 4 hours of morning sun.
Elevated balconies face consistent, dry wind currents that can snap fragile branches and dry out container soil up to twice as fast as ground beds. Always anchor your vertical shelving stands directly to your balcony railing using heavy-duty nylon zip ties, and choose wide, flat-bottomed pots that won’t easily tip over during a summer storm.
Never shovel raw dirt from a backyard yard or park into balcony containers. Natural ground dirt contains heavy clays that pack down tight like solid concrete inside container walls, suffocating fragile feeder roots. More importantly, wet yard soil is incredibly heavy and can risk exceeding balcony structural load safety limits. Always use a premium, lightweight potting mix blended with peat moss, coco coir, and perlite, as detailed in our Best Soil For Container Vegetables reference guide.
To plan your containers efficiently using the spatial principles from our Advanced Geometric Spacing Layouts and Tier Design manual, organize your first crops using this structural reference table:
| Difficulty Level | Crop Type | Best Beginner Variety | Minimum Pot Size | Daily Sun Needed | Best Tier Shelf Placement |
| Rank #1 (Easiest) | Leafy Greens | Salad Bowl, Tom Thumb | 6″ Deep Window Box | 4–5 Hours | Bottom Tier (Shade-Protected Zone) |
| Rank #2 | Bush Beans | Blue Lake Bush, Provider | 3-Gallon Fabric Bag | 6 Hours | Middle Tier |
| Rank #3 | Patio Fruit | Tiny Tim Cherry Tomato | 5-Gallon Self-Watering | 6–8+ Hours | Top Tier (Maximum Sun Tracking) |
| Rank #4 | Root Vegetables | French Breakfast Radish | 8″ Deep Trough | 5 Hours | Middle / Bottom Tier |
| Rank #5 | Summer Vines | Spacemaster Bush Cucumber | 5-Gallon Fabric Bag | 6+ Hours | Middle Tier (Trellised to Railing) |
Follow this simple, step-by-step sequence to launch your balcony containers cleanly:
Ensure every container you buy has functional drainage holes at the base to prevent waterlogging and root rot, a critical step detailed in our How To Start A Balcony Vegetable Garden blueprint. Always place deep saucers under every pot to catch excess water runoff. This simple layout adjustment prevents muddy wastewater from spilling over your patio edge onto your downstairs neighbors, a major oversight highlighted in our Balcony Gardening Mistakes warning list.
Fill your containers within an inch of the rim with your loose, soil-less potting mix. If your mix contains a high percentage of peat moss, spray it with water and mix it thoroughly with your hands before planting; dry peat moss is naturally hydrophobic (repels water) and needs to be pre-moistened to absorb water properly.
Because container gardens hold a limited volume of soil, frequent watering slowly flushes vital minerals out of the bottom drainage holes. To ensure your plants don’t starve, mix a scoop of balanced, organic slow-release granular fertilizer into the top few inches of your potting mix at planting time to provide steady nutrition for up to 8 weeks.
When watering seeds or young seedlings, avoid using a heavy pour from a bucket, which can wash away small seeds and erode soil. Use a watering can equipped with a fine rose spray nozzle or a simple spray bottle to keep the soil evenly damp, like a wrung-out sponge, a baseline routine tracked in our How Often Should You Water Container Vegetables? manual.
Chloe, a nurse working variable shifts, wanted to add fresh greens to her diet but only had a tiny 4×6 concrete balcony that received partial morning sun.
It is not recommended for small spaces. Head lettuce varieties take a long time to mature, require highly consistent moisture profiles, and can only be harvested once. Loose-leaf lettuce varieties are far superior for beginners because they grow faster and provide continuous harvests for months via the cut-and-come-again method.
Because balconies are elevated and exposed to dry wind currents, container soil dries out rapidly. During mild spring weather, watering every 2 to 3 days is usually sufficient. However, during peak summer heat waves, shallow window boxes and fabric grow bags may require deep watering once a day. Always check the top inch of soil with your finger before watering.
Yes. Because containers hold a limited volume of soil, frequent watering eventually washes vital nutrients out of the bottom drainage holes. Mix a balanced, organic slow-release granular fertilizer into your potting mix at planting time. For leafy greens, apply a diluted nitrogen-rich liquid organic fertilizer every two weeks to support rapid foliage regrowth.
This process is called “bolting.” When summer temperatures spike or the plant experiences drought stress, it shifts its energy from leaf production to seed production. The stem shoots upward, and the leaves become bitter. To prevent this, grow lettuce during the cooler spring or autumn seasons, or move your planters to the shadiest corner of your balcony during hot summer waves.
While all vegetables need some light to photosynthesize, shade-tolerant greens like spinach, arugula, and Swiss chard can produce excellent crops with just bright, indirect or reflected ambient light. Avoid all fruiting crops like peppers and tomatoes, and stick strictly to leafy foliage plants if your balcony faces a dark courtyard.
Bypass the confusion and start harvesting fresh food immediately. Download our free small-space design blueprint and engineer your urban container garden like a pro.
Download our free resource today and receive:
[ Info@Yardveggie.com ]
👉 [ DOWNLOAD YOUR FREE BALCONY QUICK-START KIT NOW ]
If you want to skip the frustrating trial-and-error cycle and discover the exact visual layouts used to maximize food production in tight urban footprints, take a look at our structured video series. Our comprehensive Balcony Harvest Masterclass offers an interactive, step-by-step roadmap built specifically for small-footprint living.
Bypass the guesswork with high-definition, practical tutorials covering:
[ Learn More About The Masterclass → ]