![]()
Stop Guessing. Start Harvesting.
![]()
Stop Guessing. Start Harvesting.
Hey there, urban homesteaders! Ever dream of stepping out onto your apartment patio and snipping fresh, crisp greens for lunch or grabbing a handful of sun-ripened cherry tomatoes for dinner? But maybe you’re holding back because you think your balcony is too small, too windy, or doesn’t get enough blasting sunlight.
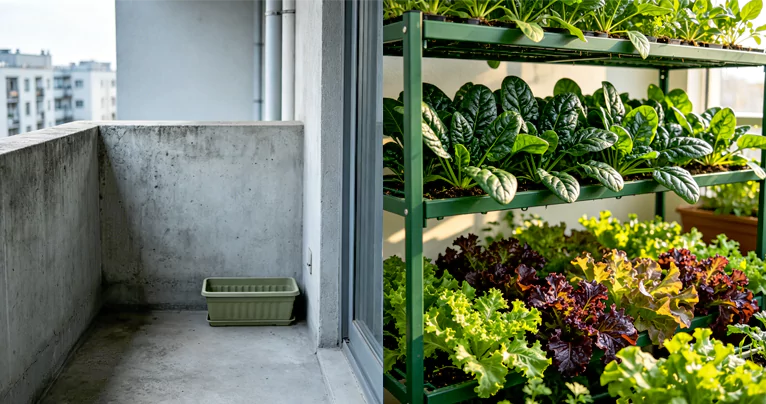
Well, here is the honest truth: growing food in containers on an elevated balcony actually gives you a massive natural advantage! You are completely insulated from ground-level yard nightmares like moles, gophers, rabbits, and nasty soil-borne nematodes. By picking the right compact plant varieties and following a structured video layout, you can easily turn a few square feet of concrete into a serious vertical food oasis.
This guide is your master blueprint and video walkthrough companion to getting your balcony crops thriving from day one.
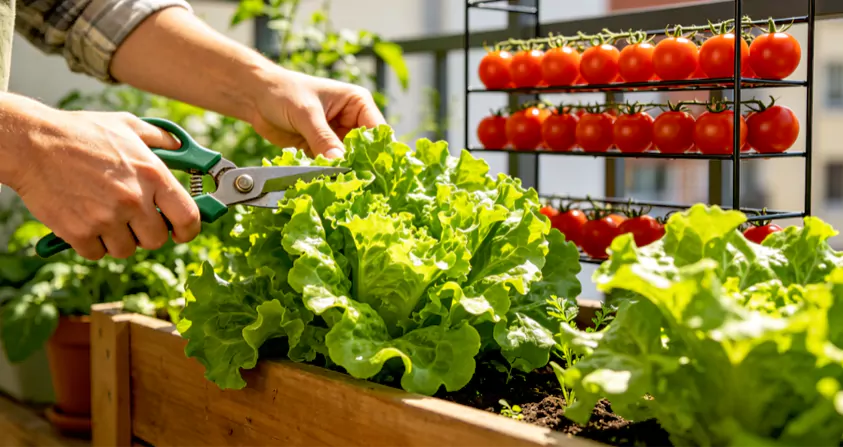
The absolute best balcony vegetables to grow are those engineered for small spaces: determinate dwarf cherry tomatoes (like Tiny Tim), snacking peppers, bush cucumbers, and loose-leaf “cut-and-come-again” lettuces. Plant them in highly breathable fabric grow bags filled with a lightweight, soil-less potting mix (coco coir and perlite) to completely bypass root rot and secure massive yields.
Before you rush to the local garden center and buy every seed packet in sight, our video tutorial highlights three critical physical boundaries you have to check on your apartment patio:
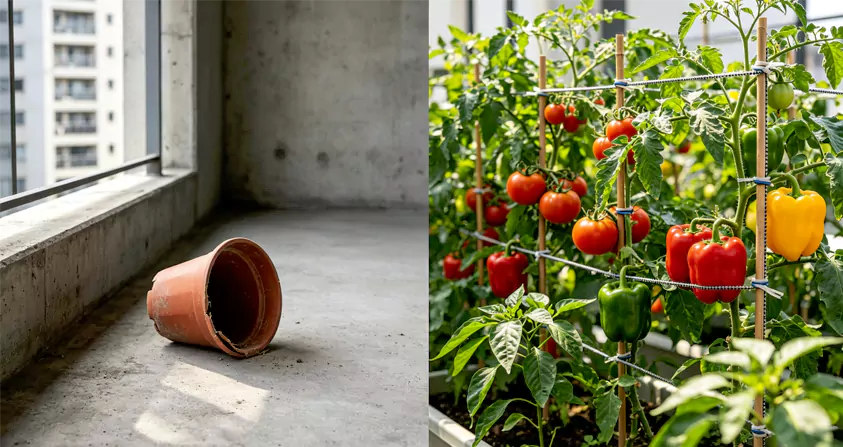
Different veggies require different amounts of light energy to produce food. Fruiting plants like tomatoes, peppers, and eggplants are absolute sun-worshippers—they need 6 to 8+ hours of direct sunlight to set blossoms and ripen fruit. If your balcony faces North or East and sits in partial shade, pivot your layout entirely toward leafy greens (lettuce, spinach, kale) and fresh herbs, which do beautifully on just 4 hours of morning sun.
Elevated balconies deal with constant, drying wind currents that can snap fragile branches and dry out container soil up to twice as fast as a ground-level backyard plot. When setting up your vertical plant stands, always anchor your shelving structures directly to your balcony railing using heavy-duty nylon zip ties, and choose wide, flat-bottomed pots that won’t flip over during a summer storm.
Never shovel raw backyard dirt or topsoil into balcony containers. Dense ground dirt packs down tight like solid concrete inside a pot, suffocating delicate feeder roots. More importantly, wet backyard clay is incredibly heavy and can risk exceeding your balcony’s structural weight limits. Always use a premium, ultra-lightweight potting mix blended from peat moss, coco coir, and coarse perlite, as detailed in our Best Soil For Container Vegetables reference guide.
To maximize your limited footprint using the principles from our Advanced Geometric Spacing Layouts and Tier Design framework, use this targeted matrix to quickly arrange your vertical layout:
| Veggie Group | Top Recommended Variety | Minimum Pot Size | Daily Sun Needed | Ideal Tier Shelf Placement | Key Growth Habit |
| Patio Tomato | Tiny Tim / Patio Choice | 5-Gallon Fabric Bag | 6–8+ Hours | Top Tier (Maximum sun tracking) | Bushy, dwarf, stops growing at 1.5 ft |
| Snacking Pepper | Shishito / Sweet Mini | 3-Gallon Pot | 6+ Hours | Top / Middle Tier | Compact, sturdy, loaded with small pods |
| Bush Cucumber | Spacemaster | 5-Gallon Fabric Bag | 6+ Hours | Middle Tier (Trellis to your railing) | Short vines, high yield, disease resistant |
| Leafy Greens | Black Seeded Simpson | Window Trough Box | 4–5 Hours | Bottom Tier (Uses upper plants for shade) | Cut-and-come-again, infinite harvests |
| Speedy Roots | French Breakfast Radish | 8″ Deep Planter | 5 Hours | Middle / Bottom Tier | Super fast maturity (25 days), shallow roots |
Follow this simple, clean sequence to set up your balcony containers like a seasoned pro:
Assemble a sturdy, weather-resistant tiered plant stand or ladder rack against your sunniest wall. Going vertical expands your growing space by up to 300% and lets you stack sun-lovers on top while shade-loving greens chill out safely underneath.
Ensure every container you use has functional drainage holes to prevent soggy soil, a vital step from our How To Start A Balcony Vegetable Garden master blueprint. Crucial detail: Always place deep saucers under every pot to catch excess water. This stops muddy, fertilized runoff from leaking over your patio edge onto your downstairs neighbors—a massive mistake highlighted in our Balcony Gardening Mistakes list.
Fill your pots within an inch of the rim with a loose, soil-less mix. If your mix contains dry peat moss, spray it with water and work it with your hands before planting. Dry peat is naturally hydrophobic (repels water), so pre-moistening ensures water doesn’t just slide down the inner walls of the pot.
Because containers hold a small volume of soil, frequent watering slowly flushes vital minerals out of the bottom drainage holes. To keep your plants from stalling out, mix a healthy scoop of balanced, organic slow-release granular fertilizer into the top few inches of your mix at planting time.
Lisa, a graphic designer with a west-facing apartment patio, wanted to make her own fresh salsa but struggled with extreme high-rise wind.
Head lettuce varieties take a long time to mature, require highly consistent moisture profiles, and can only be harvested once per crop. Loose-leaf lettuce is the ultimate beginner balcony crop because it grows incredibly fast and supports the “cut-and-come-again” method—you simply snip off the mature outer leaves for a salad, and the center keeps pushing out fresh leaves for months!
This is a classic symptom of “wind burn” or thermal reflection shock. Elevated balconies deal with harsh wind currents that dry out leaves faster than roots can absorb water. Additionally, if your pots are pressed tight against a sun-baked concrete or brick apartment wall, the reflected heat can literally scorch your plants. Move your pots at least 6 inches away from walls and consider adding a mesh windbreak screen.
Yes, absolutely! Plastic pots are entirely sealed, meaning if the bottom holes get clogged with debris, the base turns into a stagnant, oxygen-free swamp that drowns roots. Fabric grow bags are made from highly porous material, allowing excess water to seep out from the side walls seamlessly. They also introduce oxygen from 360 degrees, which naturally “air-prunes” the roots and prevents them from circling tightly and binding.
If your balcony faces a dark courtyard or is completely North-facing with no direct sun, you must skip all fruiting crops like tomatoes and peppers. However, you can still get a fantastic harvest of shade-tolerant greens and herbs! Baby spinach, arugula, Swiss chard, mint, and chives thrive on just bright, indirect or reflected ambient light and will actually taste sweeter than if they were blasted by hot direct sun.
If your plant is wilting during cool evening hours when the soil is completely wet, or if the lower leaves are turning a uniform, sickly pale yellow, root rot is likely active. To confirm, gently slide the root ball out of the pot: healthy roots are crisp, firm, and bright white, while rotted roots look dark brown, feel slimy or mushy, and emit a distinct, sour, swamp-like odor.
Skip the guesswork and start harvesting fresh food immediately. Download our free small-space design blueprint and engineer your urban container garden like a seasoned pro.
Download your free resource today and get:
[ Info@Yardveggie.com ]
👉 [ DOWNLOAD YOUR FREE BALCONY VEGETABLE KIT NOW ]
If you want to bypass the frustrating trial-and-error cycle of stunted growth and waterlogged containers, check out our structured video training series. Our comprehensive Balcony Harvest Masterclass delivers an interactive, step-by-step roadmap built specifically for small-footprint urban environments.
Bypass the guesswork with high-definition, practical tutorials covering:
[ Learn More About The Masterclass → ]