![]()
Stop Guessing. Start Harvesting.
![]()
Stop Guessing. Start Harvesting.
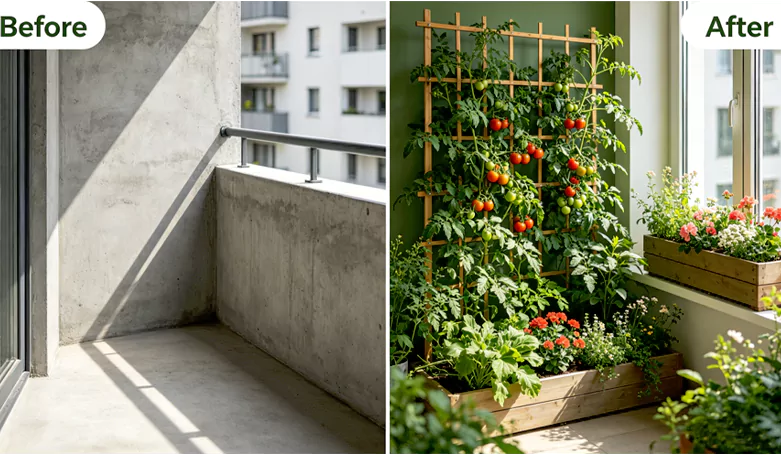
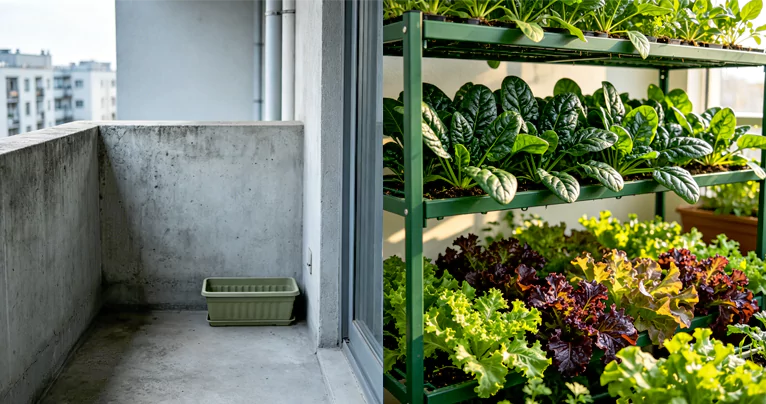
Do you want to turn your empty apartment balcony into a lush, edible oasis but don’t know where to place your first pot?
Setting up a balcony vegetable garden is the perfect way to access fresh, organic food right outside your door. Growing food in elevated containers actually offers a massive natural advantage: it completely insulates your crops from common ground-level yard pests like moles, rabbits, and destructive soil nematodes. By following a structured video framework and mastering simple container setups, you can maximize your small concrete footprint for an outstanding seasonal harvest.
This comprehensive guide serves as your visual blueprint and operational script to launch a high-yield balcony garden from scratch.
To build a successful balcony vegetable garden, pair compact, bush-style varieties (like dwarf cherry tomatoes, bush cucumbers, and loose-leaf lettuce) with lightweight fabric grow bags or self-watering planters. Utilize an ultra-porous potting mix blended with perlite to ensure optimal drainage and root aeration on elevated apartment patios.
Before you start planting seeds, you must plan your containers around your balcony’s specific environmental conditions. Track these three layout parameters to guarantee success:
Different crops require different amounts of direct sunlight. Fruiting plants like tomatoes and peppers need a minimum of 6 to 8 hours of full sun to set fruit, making them perfect for South or West-facing balconies. If your balcony is North or East-facing and mostly shaded, focus your layout entirely on leafy greens and herbs, which thrive on just 4 hours of morning or indirect light.
Elevated balconies face intense wind currents that can snap fragile stems and dry out container soil up to twice as fast as backyard ground beds. Always anchor your vertical shelving stands directly to your balcony railing using heavy-duty nylon zip ties, and choose wide, flat-bottomed pots that won’t easily tip over during a sudden storm.
Never fill balcony containers with heavy, dense backyard yard dirt. Wet clay soil is incredibly heavy and can exceed balcony structural weight limits while suffocating plant roots. Always use an ultra-lightweight, soil-less potting mix made of peat moss, coco coir, and perlite, as detailed in our Best Soil For Container Vegetables reference guide.
To plan your containers efficiently using the principles from our Advanced Geometric Spacing Layouts and Tier Design manual, organize your plants using this structural reference table:
| Vegetable Group | Recommended Variety | Minimum Container Size | Sunlight Needed | Best Tier Shelf Placement |
| Sun-Loving Fruit | Patio Choice Cherry Tomato | 5-Gallon Bag | 6–8+ Hours | Top Shelf (Maximum Sun Tracking) |
| Compact Heat Crops | Early Jalapeño / Shishito | 3-Gallon Pot | 6+ Hours | Top / Middle Shelf |
| Vertical Vining | Spacemaster Bush Cucumber | 5-Gallon Bag | 6+ Hours | Middle Shelf (Trellised to Railing) |
| Shallow Salad greens | Butterhead Lettuce / Spinach | Window Box | 4–5 Hours | Bottom Shelf (Partial Shade Shield) |
| Fast Root Crops | Cherry Belle Radish | 8″ Deep Trough | 5 Hours | Middle / Bottom Shelf |
Follow this step-by-step production checklist to build your small-space container farm smoothly.
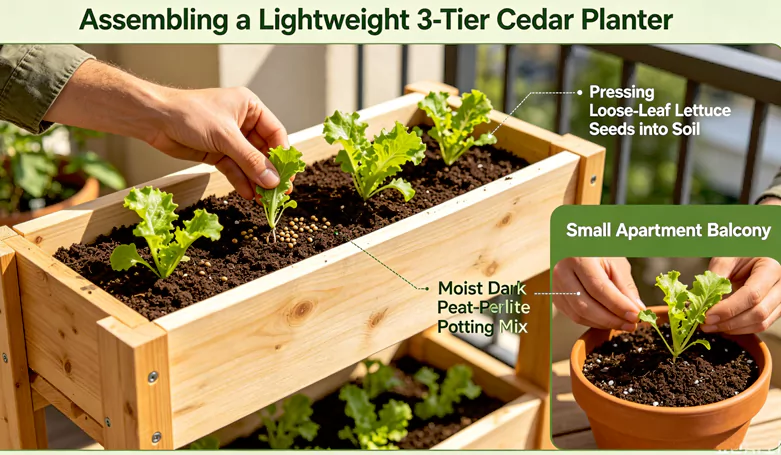
Assemble a heavy-duty, weather-resistant tiered plant ladder or shelf stand. Placing pots vertically allows you to stack multiple containers safely over a tiny footprint while ensuring lower plants aren’t blocked from the sun by taller varieties.
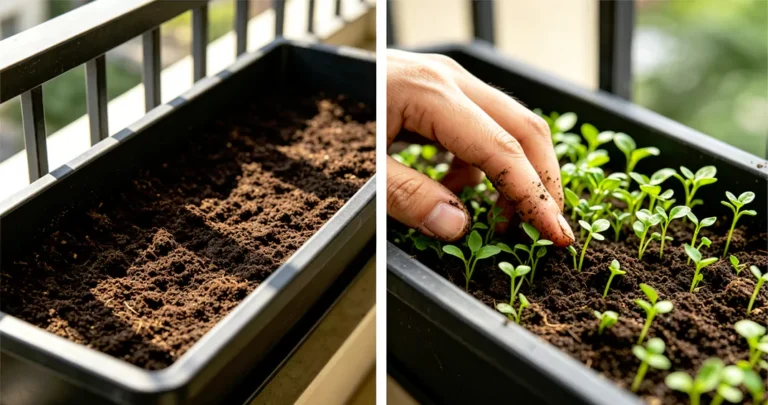
Ensure every container has drainage holes at the bottom to prevent waterlogging and root rot, a critical setup step explored in our How To Start A Balcony Vegetable Garden roadmap. Always place deep drainage saucers under every pot to catch water runoff, preventing muddy leaks from spilling onto your downstairs neighbors’ patios, a major oversight highlighted in our Balcony Gardening Mistakes list.
Fill your fabric grow bags or plastic planters within an inch of the rim with your soil-less mix. Mix in an organic slow-release granular fertilizer to supply steady nutrients to your vegetables for the first two months.
For climbing or tall crops like bush cucumbers or dwarf tomatoes, insert sturdy bamboo stakes or a small plastic cage into the container at the time of planting. This gives the roots a chance to grow securely around the support base before high winds kick in.
Protect your hard work by steering clear of these common urban gardening errors:
Maya, a software engineer living in a high-rise downtown apartment, wanted to grow her own fresh ingredients but only had a 5×5 concrete balcony that faced strong evening wind gusts.
Yes! Vertical vining crops like sugar snap peas and pole beans are excellent choices for balconies because they grow straight up, saving valuable floor space. Place a large container against your balcony wall or railing and install a lightweight mesh netting or bamboo teepee trellis for the tendrils to climb safely.
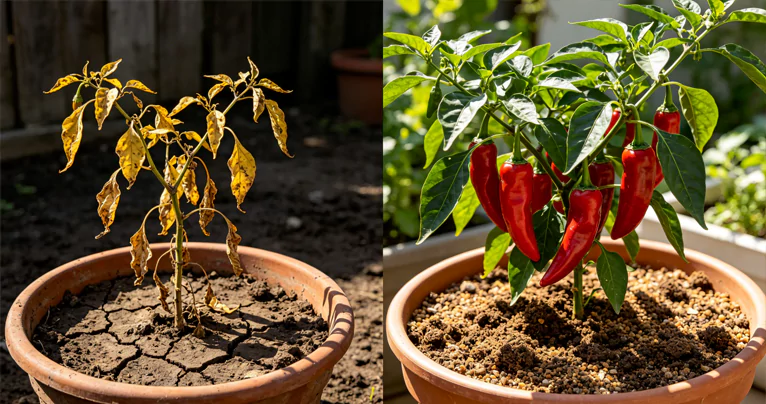
This is typically a symptom of wind burn or thermal reflection shock. Elevated balconies face intense wind currents, and concrete apartment walls absorb midday sun, radiating intense heat back onto your plants. To protect your crops, move sensitive varieties closer to the building wall, or mount a fabric privacy screen along your railing to diffuse harsh winds.
Because balconies are elevated and windy, container soil dries out up to twice as fast as ground beds. During mild spring weather, watering every 2 to 3 days is usually sufficient. However, during peak summer heat waves, shallow containers and fabric grow bags may require deep watering once or even twice a day.
Because balcony vegetables grow in isolated containers, frequent watering rapidly flushes vital nutrients out of the bottom drainage holes. To fix this, mix an organic slow-release granular fertilizer into your potting soil at planting time, and follow up by feeding your plants a water-soluble organic liquid fertilizer every 10 to 14 days to maintain steady growth.
Most modern residential apartment balconies are engineered to safely support structural loads of 30 to 40 pounds per square foot. By utilizing lightweight fabric grow bags, plastic utility buckets, and loose, soil-less potting mixes, you can keep your garden extremely lightweight and perfectly safe.
Stop guessing and start planting. Download our free balcony garden design blueprint and engineer your small-space urban container farm like a seasoned expert.
Download our free resource today and receive:
[ Info@Yardveggie.com ]
👉 [ DOWNLOAD YOUR FREE BALCONY VEGETABLE KIT NOW ]
If you want to skip the frustrating trial-and-error cycle and discover the exact visual layouts used to maximize food production in tight urban footprints, take a look at our structured video series. Our comprehensive Balcony Harvest Masterclass offers an interactive, step-by-step roadmap built specifically for small-footprint living.
Bypass the guesswork with high-definition, practical tutorials covering:
[ Learn More About The Masterclass → ]